
Updated May 2022
HDR YouTube video created for Austin Evans, entirely graded and mastered using this workflow.
Introduction
The Backstory...
I created this workflow while working for Overclock Media/the Austin Evans YouTube channel.
We had an upcoming project where we knew that we would have an opportunity to get some super dynamic footage.
A race through the Nevada Desert in sports cars… what more could you want?
After perhaps a bit too much inspiration from a certain shared-favorite car show on Amazon Prime, we realized that our video would be perfect for HDR...
But we had no way of monitoring an hdr color grade.
First off, buying or even renting a professional HDR grading monitor was out of the question, financially.
Secondly, even though there was an HDR TV in the office (with a Chromecast Ultra for watching HDR YouTube videos), as of writing this, Windows (my OS) barely had HDR support.
Windows claimed support on the individual application level, but it hadn't yet been implemented OS-wide. We tried everything, but we couldn't get any computer and the TV to jive in HDR.
And before you say it: no, Mac OS didn't support it either.
And the biggest issue of all...
YouTube has no way of uploading separate HDR and SDR grades for a video.
The fact of the matter is that the majority of people viewing a widespread YouTube video will be viewing it on an SDR device, or a device that is only HDR compatible in name along has them in name alone (many smartphones with HDR displays can’t hit the full range of colors or brightness as outlined in the HDR standards).
Not being able to control what the majority of viewers see isn’t exactly appealing.
So this where you give up and accept fate, right?
NOPE! Instead, I embarked on a "mission from God" to create a usable workflow for grading HDR video on a Rec.709 monitor. All while optimizing the final product for both SDR and HDR devices.
And if I may...
It's Pretty Freakin' Cool.
Is it the "technically correct" way to do this? No. Not at all...but it WORKS!
If you are working on a large, commercial project and have the means, of course you should go to a color facility with proper HDR gear and a workflow to match.
That said, I've actually been really surprised at just how well this workflow has been performing. After hammering out the kinks (and trust me, there were a few), I'm honestly finding it just as reliable as a normal Rec.709 workflow.
SO, whether you're a smaller production outfit, or just someone who likes playing with the latest in video tech...
I hope this write-up can help you out!
(plus it's filled it with lots of fun pictures!)
Tech Specs
Gear used to create and test this workflow

CameraS
SONY PXW-FS7 (x2)
Negative Format
3840 x 2160 / 23.976fps
10 bit 4:2:2 XAVC-I
S-Log3 S-Gammut3.Cine
HDR TV
LG - 55" E6 OLED 4K HDR Smart TV (OLED55E6P)
Chromecast Ultra
Caffeine
Augies (RIP)
Starbucks
Monster
Grading Monitor
EIZO CX271
Workstation
Lenovo P70
Intel Xeon E3-1505M v5
NVIDIA Quadro M4000M
AMD Ryzen 3970X - 2022
NVIDIA RTX 3090 - 2022
Windows 10 Pro
Software
Davinci Resolve Studio 12.5
Resolve Studio 17.4.6 - 2022

Plan of Attack
So How exactly are we going to do this?
As this workflow was originally designed for YouTube video uploads, it is based on the specifications outlined in YouTube's HDR "whitepaper". You can find that full post by clicking here.
If you are just looking to do an HDR grade for a video that isn't intended for YouTube, this workflow will still work perfectly well for you. There are just a few steps that you won't have to complete.
YouTube-Specific HDR
In a perfect world, you would create two separate grades: one for HDR, and one for SDR (Standard Dynamic Range) displays. HOWEVER, as I mentioned earlier, YouTube doesn't have any way to upload two different grades for the same video.
Q: So what do we do to ensure that people can watch our videos on both HDR and SDR displays?
A: Well, there are two options...
When you upload an HDR video to YouTube, an SDR version of your video will be automatically created by YouTube's back-end processing. This is the version that people using regular SDR displays will see.
It's honestly a pretty okay conversion in evenly-lit situations, but if you want to take control of things, you can package a custom LUT in with your video file. YouTube will see it, and use it to do the HDR to SDR conversion, instead of it's own algorithms.
That second option is what I have been focusing on. From my tests and outside projects, it's worked perfectly. I'll guide you through that process later on in this post.
Here's an outline of the workflow:
Setting-up your Davinci Resolve Project
Grading Tips
Creating the Video File
Rendering out of Resolve
SDR Conversion LUT Creation
Inserting Required Metadata
Uploading to YouTube
I've designed the workflow for Davinci Resolve Studio, running on a Windows-based PC.
Everything should work in the free version of Resolve as well, but I can't guarantee how well things will translate over to other software packages/grading applications.
There are also some elements of this workflow that are based more on understanding how consumers watch web video, rather than technical standards (I'll point them out as they come up).
We will be grading for Rec.2020, using an
ST.2084 EOTF
But first things first...
Some Background
A quick glossary to clear up some common confusions
Feel free to skip this if you're too cool for school
What is an EOTF?

EOTF stands for "Electro-Optical Transfer Function"
Mathematical function that defines how digital imaging data is translated to brightness on a display
Opposite of an OETF
OETF stands for "Opto-Electrical Transfer Function"
Defines how light going into a camera is translated to digital data.
Examples found in today's cinema cameras include:
Canon's Cannon Log
Sony's S-Log, S-Log 2, S-Log 3
Arri's Log C
EOTF can be thought of as the "gamma curve" of the video's intended display color space
Similar to how the Rec.709 colorspace uses a 2.4 gamma curve, or the BT.1886 gamma function (the newest recommended standard)...
...or even a 2.2 gamma curve, if you're referring to the older variant designed for CRTs
There are two EOTFs being used in HDR today
PQ (ST.2084)
"Perceptual Quantizer"
HLG
"Hybrid-Log Gamma"
The Two Big Standards:
HDR10 vs. Dolby Vision
(the main differences)
HDR10
10 bit color
Utilizes a PQ (ST.2084) EOTF
Open standard
Theoretical max brightness: 4,000 nits
Current max brightness: 1,000 nits
Supported by Amazon Prime Video & YouTube
Dolby Vision
12 bit color
Utilizes a PQ (ST.2084) EOTF
Requires proprietary Dolby equipment for file creation
Theoretical max brightness: 10,000 nits
Current max brightness: 4,000 nits
Supported by Amazon Prime Video
YouTube support currently unclear
The biggest difference on the consumer end, is that Dolby Vision certified display devices can also display HDR10 content. This is NOT true in the opposite direction.
This is why, if you can, it is better to get a Dolby Vision certified device rather than one that is just HDR10 compatible.
To learn more...
Click here for the Dolby Vision Whitepaper
EOTFs:
PQ vs. HLG
(The Main Differences)
PQ
("perceptual quantizer")
Just an EOTF
Also referred to as: "ST.2084"
From it's SMPTE standard name: "SMPTE ST-2084"
Used by both HDR10 and Dolby Vision
Dominant EOTF being used in the United States, for HDR Video
Currently supported by all of the major HDR display manufacturers
Not backwards compatible with SDR displays
Recommended for YouTube
HLG
("Hybrid Log-Gamma")
An entire HDR standard, with it's own unique EOTF
Also referred to as: "ARIB STD-B67"
Standard name from the Association of Radio Industries and Businesses in Japan
Utilizes Rec.2100
Co-developed by the BBC and NHK
Only really in use in the UK
Not yet supported by most of the major HDR display manufacturers
Backwards compatible with SDR displays
Not recommended for YouTube
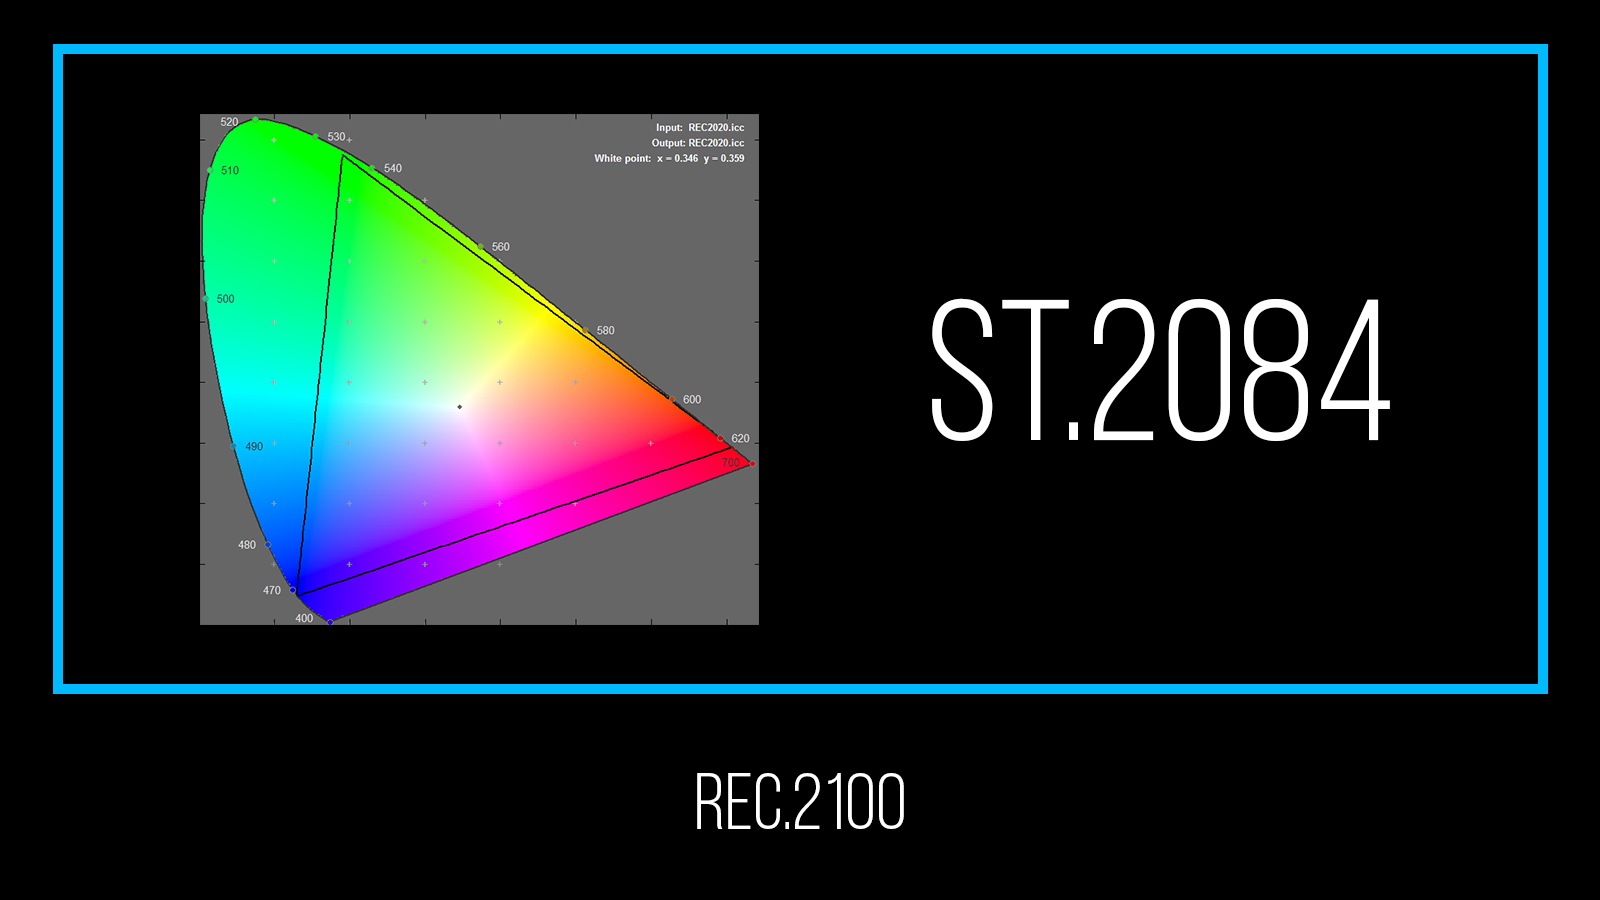
Colorspaces:
Rec.709 vs Rec.2020

Rec.2020 is the colorspace used to grade and display HDR video.
As seen above, It has the same D65 whitepoint as Rec.709, but has a much larger gamut.
Rec.2020 vs. Rec.2100
Rec.2020 is just a color space, with a defined set of color primaries and a white point
Rec.2100 takes things a step further, and packages Rec.2020 with an EOTF.
Can include either an ST.2084 or HLG EOTF
Time for some examples!
(as seen in Davinci Resolve)
Rec.2100 ST2084
Rec.2020 with an ST2084 EOTF
(for HDR10 or Dolby Vision color grading)
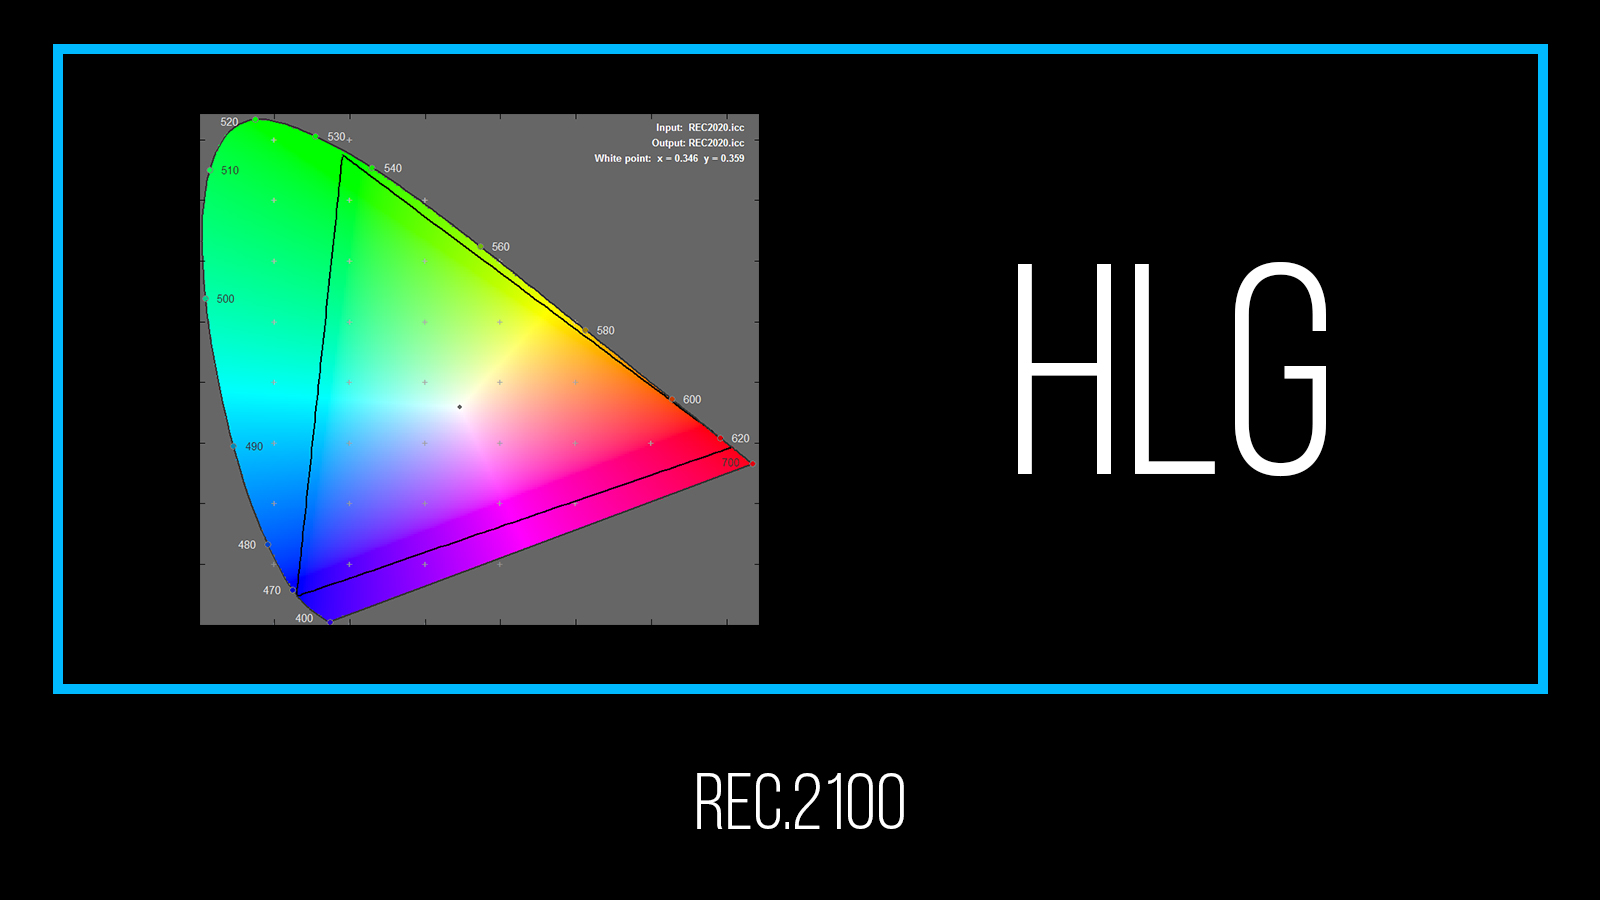
Rec.2100 HLG
Rec.2020 with an HLG EOTF
(for HLG color grading)
So, again
We will be delivering an HDR10 grade, for Rec.2100 ST.2084
We'll also "define" our grade as intended for 1000 nit max displaying
This is all per YouTube recommendations. Capisce?
Some Housekeeping
Monitor
While using this workflow, I suggest keeping your monitor calibrated to Rec.709, with a gamma of 2.4, and at a brightness between 200-300 nits.
This is way brighter than Rec.709 is supposed to be, but I suggest 200-300 because:
It gets you closer to the brightness intended for HDR (1000 nits, in our case), which will help you grade more accurately
Most current HDR devices can only output 300-600 nits anyways
This number strikes a nice balance between current HDR TV brightness, and the usual brightness of the devices most people watch YouTube videos on (smartphones, laptops, etc.)... hardly anyone is ever in-spec.
Shooting Tips
I'm not going to go into too much detail here. In general, there a few things to aim for when shooting for an HDR grade:
Record 10 bit, 4:2:2 at minimum
To avoid banding & artifacting
Shoot Log/maximum dynamic range available on your camera
Watch your highlights and speculars
Clipping is VERY noticeable in HDR
Exposure differences can also be very apparent, from shot to shot
Polarizers are always a good idea when outside
Stay as close to Native ISO as possible
HDR grades are prone to bringing out digital noise, as a lot of signal range is given to the shadows
Especially important if you plan to lift shadows in post
Proficiency
While I've done my best to keep this write-up as clear as possible (and full of fun colors and pictures, after reading many bland reports, myself), it does assume a bit of proficiency on your end.
This is in regards to working in Resolve, as well as color grading, video tech specs, and HDR in general.
That said, if you're just in this for the sheer joy and excitement of reading workflow breakdowns, read-on, my friend.
Simulated HDR
This workflow utilizes a LUT that I designed, as well as a a very lightweight GUI that I built for some software (all of which I will ask you download below).
The LUT does a basic HDR to SDR conversion, as well as some additional tweaks to better simulate the relative contrast of an HDR image on an SDR display.
Their file names or displayed version numbers may vary from what I have written/in the screenshots below.
Rest assured that they will still work exactly as described, just with some minor updates on the back end (that I've made since beginning this write-up).
Checking your grade
While the point of this workflow is to be able to do everything on a Rec.709 monitor, having an HDR capable device to check your work can be handy. Not in the sense of checking every shot, but just as a general double check before making the video "public" on YouTube, or to check minor details in the grade.
I'll usually upload an unlisted YouTube video, and play it back on an HDR TV via a Chromecast/Google TV/Apple TV/built-in YouTube app, or even an HDR-capable smartphone (anything from the iPhone X or "world's finest" Galaxy Note 7 onward).
It's especially helpful to have one of these devices on hand when you are starting out, and still learning how HDR behaves. While the LUT used in the workflow does a good job of simulating how things will look once in HDR, some details (like highlight roll-off) are much more defined in HDR than can be simulated.
Thing's you'll need
There are a few......
Updated May 2022
In the zip folder you'll find two files: a batch program called "HDR_metaJECTOR", and a LUT titled "HDR-Monitor".
Extract/un-zip the folder, and keep the program and LUT inside. We'll need them together in the same folder later on.
Place a copy of the LUT in Resolve's LUT directory.
Open the "Windows" folder, then either "32bits" or "64bits" folder (depending on your processor), and download the "mkvmerge.exe" and "mkvinfo.exe" files.
Copy these two programs into the un-zipped "Wesley_Knapp_HDR_Tools" folder.
The Workflow
Getting Started
Updated May 2022 (Resolve 17.4.6)
Setting up Your Davinci Resolve Project
SO, here is how you should set up the "Color Management" section of your Resolve project:
Color processing mode: SDR Rec.709
Output color space: Rec.2020 Rec.2100 ST2084
(enable) HDR mastering is for: 1000 nits
Select: Enable HDR10+
If you don't have the option to change all of these drop-downs, make sure that the "Color science" drop-down is set to: "DaVinci YRGB Color Managed".
Remember the LUT that I mentioned earlier (the one to help visualize how SDR video will look on an HDR display)? This is where we are going to put it to work.
Under the "Lookup Tables" section:
Video monitor lookup table: HDR-Monitor_vX-Y_WesleyKnapp
The weirdness with Scopes…
As of writing this update (May 2022), Resolve has a few bugs (or features, depending on who you ask) that prevent you from applying a monitoring LUT without affecting the scopes IF you are using an external grading monitor that gets its video via your system's GPU (eg. Displayport or HDMI).
If you are grading with this setup, I'd recommend keeping your waveform set to the standard 10-bit (SDR) setting. Once you have completed your grade (or incrementally throughout, if you wish), I'd recommend doing an HDR luminance QC check, by disabling the monitoring LUT and setting the waveform to HDR mode.
If you're doing all your work on one monitor OR with an external monitor being fed by an interface (such as a Blackmagic Decklink card), you can use the following setup to use the monitor LUT without effecting the scopes...
Disable the "Enable HDR 10+" option in the step above. Instead of loading the LUT into the "Video monitor lookup table" slot, load it into the "Color viewer lookup table" slot. You will see the LUT'd image in your grading window (and monitor), but the scopes should remain unaffected. You can now set your waveform to HDR mode, and grade that way.
If you aren't familiar with HDR waveforms, you'll notice things vary a bit from the ones you're used to with SDR. Instead of the Y-Axis reading 10bit data values from 0-1024, it will now show brightness (in "nits") from 0-10,000.
You will also notice that the scale is not uniform, but instead increases seemingly exponentially. This is one reason why I can't stress enough that...
"Color Management" tab can be found by going to "File" > "Project Settings"
HDR Waveform Setting
SDR Waveform Setting
THE SCOPES ARE YOUR FRIEND

HDR Grade WITH Monitor LUT (SDR waveform in previous section)

HDR Grade WITHOUT Monitor LUT (HDR waveform in previous section)
grading the footage
As creating a good grade is highly subjective and varies from project to project, I'm not going to be delving too much into the creative side of things.
The biggest piece to remember is to always watch your scopes.
Note just how much room on the waveform is dedicated to the 0-100 nit range (out of our 1000 nit max) when the waveform is set to HDR mode.
The Monitor LUT that I had you implement in the previous section is designed to give a really solid "simulation" of what your grade will look like on an HDR display, so…
feel free to grade away as normal!
This being said, you will notice that the LUT may cause specular highlights towards the very top of the range to start rolling-off in the grading window. They may even start to appear to be clipping in the SDR waveform...
...and that's OKAY!
As long as you keep an eye on things, and double-check your grade on an HDR waveform (especially if your system setup is such that you are using an SDR waveform to grade, as discussed earlier), you can have full confidence in your highlight control.
Just disable the Monitor LUT, set the waveform to HDR mode, and check the grading window for visual confirmation (as seen to the left). I do this a bunch. If no clipping is shown now in the grading window or HDR waveform, you’re good.
The Monitor LUT’s highlight rolloff is designed to be as aesthetically pleasing as possible, but at the end of the day, it’s designed more for technicality than creative aesthetic.
Remember that you can always make a custom HDR to SDR conversion LUT that reins-in the image exactly how you’d like, for your SDR viewers on YouTube.

Waveform of the pure HDR Grade, itself, for the three images below

HDR Grade without any monitoring LUTs applied

HDR Grade with a custom YouTube HDR to SDR converstion LUT

HDR Grade with the HDR Monitor LUT
The Power of Windowing
My apologies...it was right there….
One thing that I've noticed with HDR, is that highlight clipping and exposure changes from shot-to-shot are VERY apparent.
For this reason, and the fact that you now have more latitude to play with, windows are your friend.
Below are some samples from a shoot that utilized some heavy windowing to control both the sky and ground separately.

Using a Power Window to Seperately Control the Sky and Ground

Complete Grade

Grade without Sky Window

Waveform of the HDR Grade Above
Take Your Time
When you first start out grading HDR video, you'll notice that some controls, such as the Primary Wheels, can effect the image a little bit differently than they do during a Rec.709 grade.
There is an "HDR Mode" that you can apply to individual nodes, but I haven't found it to be of any help, really.
Chances are that your creative LUTs (if you have any) will also not work as you'd normally expect.
My best advice is to take your time, and play around with some test footage before jumping into a big project (as you would with any new video tech).
It doesn't take long to get the hang of HDR grading, especially if you're already comfortable doing a Rec.709 grade. Once you get the hang of things, you'll find that it really is pretty straightforward.
OUTPUT & UPLOAD
Rendering: Output pt. 1
The rendering/output process is where things are going to get very specific to YouTube. But as I mentioned before, the resulting file should be good to go for other HDR applications as well (just skip pt.2 of this section, if you're in that camp).
There are three main steps here, and the first is the obvious one: rendering out of Resolve.
Here are the video specs that need to be in place when rendering:
Format: Quicktime
Codec: DNxHR HQX or H265
DE-SELECT: Export HDR10 Metadata & Embed HDR10 Metadata
If using H265: Main10 or Main 4:4:4 10 Encoding Profile. Constant Bitrate (300Mbps or higher for UHD)
Pixel aspect ratio: Square
Data Levels: Video
Color Space Tag, Gamma Tag, Data burn-in: Same as project
THIS WILL CREATE AN MOV FILE
For audio, while YouTube recommends using the AAC codec, I've had no problems going with PCM.
Although they also say that H264 can be used, I've run into issues with using it not triggering YouTube's HDR detection, so I wouldn't recommend it.
ProRes 422 and 4444 are supported as per the documentation, but I have not personally tested them (as my workstation is a PC). That said, if you're on a Mac, give it a shot, and let me know how it goes!
Color Management Settings for Creating a Custom HDR to SDR Conversion LUT
custom HDR to SDR conversion: Output pt.2
This step is ultimately up to you. I have personally used the HDR-Monitor LUT (that we just used to monitor while grading) as the YouTube HDR to SDR conversion LUT on a large number of projects, and the results are always spot-on.
That said, sometimes you might want to punch things up a bit for your SDR version.
Whatever the reason, if you wish to create a custom HDR to SDR conversion LUT for YouTube to use:
Bring your newly rendered/graded file back into Resolve, and put it in a new Project and Timeline
Set the "Color Science" to: Davinci YRGB Color Managed
Set the "Color Processing Mode" to: SDR Rec.709
Set the “Output Color Space” to: Rec.709 Gamma 2.4
Ensure “Enable HDR10+” is unchecked
Ensure no LUTs are selected under “Lookup Tables”
Right click on the video file in the media pool, and set “Input Color Space” to: Same as Timeline
Create a grade that you like (that works for your entire video)
Generate the 3D CUBE LUT
And that's it!

Video with an early version of the HDR-Monitor LUT applied

mkvmerge.exe with the Recommended Flags

MetaJECTOR: A Simple UI for mkvmerge.exe and mkvinfo.exe
MetaJECTOR should be pretty straight forward to use, but just in case, here's how you operate it:
Double click on the MetaJECTOR program to open it
Drag and drop your rendered/graded HDR video file onto the window, and press ENTER
Type in the desired name for the new output file (don't forget to include the .mkv extension on the end), and press ENTER
Type: "Y" if you wish to include a custom HDR to SDR LUT, or "N" if you don't (and want to use YouTube's automated processing). Press ENTER
If you typed: "Y", now is when you drag and drop the LUT onto the window that you'd like to use (you won't see this step if you typed: "N"). Press ENTER
Double check that the file paths look correct. If all looks good, press ENTER, and watch the magic happen.
Red text will appear on the screen with a progress percentage at the bottom. This is mkvmege.exe creating the .mkv file.
The time it takes to complete will vary greatly depending on length of video, and computer hardware specs. That said, it should be relatively quick.
Once the file creation is complete, the text will go green, and display a whole bunch of metadata in the file. This is mkvinfo.exe being run, and is a great time to give everything a last look.
Press any key to exit, and you're done!
H265 Render Settings
Input Color Space setting for creating a custom HDR to SDR LUT from your newly graded HDR video

Same video as on the left, with a custom HDR to SDR Lut (created for its SDR YouTube version)
The Funky Part: Output pt.3
As things currently stand, Resolve can render HDR video with all of the correct color management and metadata most applications need to play it back correctly… but for some reason YouTube still struggles with parsing that metadata correctly.
There is no manual way to tell the YouTube Uploader that the video you are uploading is HDR. Because of this, you need to inject HDR-specific metadata into the video file itself, so as to trigger YouTube's HDR processing.
The way to do this is via the "mkvmerge" application (that I had you download earlier in the "Things You'll Need" section). This tool packages the rendered HDR video file and a custom HDR to SDR LUT (optional) into an MKV file that YouTube will read as being HDR.
Unfortunately for us Windows users, this tool is only available to us in an .exe to be run from command line with a bunch of flags.
THIS BEGAN TO BECOME A BIT OF A NUISANCE, SO...
I created a drag and drop ui called metajector
It's a lightweight Windows Batch Script that I've included in the "Wes's HDR Tools" zip folder that I had you download earlier.
It's super simple to use, and has some funky fresh colors!
As I mentioned before, make sure the metaJECTOR program is in the same folder as mkvmerge.exe and mkvinfo.exe. Also make sure a copy of the HDR to SDR LUT you wish to use is in there.
NOTE: THIS FOLDER IS WHERE METAJECTOR WILL PLACE THE NEW MKV VIDEO FILE IT CREATES. Make sure your have enough storage space available.

MetaJECTOR v2.3, Ready to Create an .mkv File. Look at that Color! How Fun!

MetaJECTOR v2.3, Creating the .mkv File using mkvmerge. Oh Wow, it's Red Now!

MetaJECTOR, Displaying the Output File's Metadata using mkvinfo. Hoory, it's Green!
You now have a video file ready for upload!!
Upload your new .mkv file to youtube, as normal
And while you wait, go hang out with friends or something...after all, you just spent the better part of an afternoon reading some dude’s niche blog post and could do with some socializing.
Tell your them about your awesome new HDR video.
Trust me, they'll think you're SUPER cool.
Feel free to give me a shout if this worked for you, or if you have any questions!
Email: wesleyknappfilm@gmail.com
Or just drop a comment below!
If this guide helped you, or filled you with unbridled joy, the likes of which the world has never seen…
Q&A
Answering some of the questions that I've received...and you may have had while reading this
(Updated as I get 'em)
Q: Wes, why did you select "Video Levels" when rendering out of Davinci?
A: It seems that as with Rec.709 video, YouTube still likes HDR videos to be uploaded with legalized video levels. Extended range (labeled as "Data Levels" in Resolve) will result in crushed blacks. This conclusion came after a bit of testing, by creating and uploading custom stepped gray charts, and seeing how YouTube treated them after processing.
Q: What’s the difference between putting the Monitor LUT in the "Color Viewer" section, versus “Video Monitor”?
A: Putting the LUT in the “Color Viewer Lookup Table” section means that the LUT will ONLY be applied to what is being seen in the grading window. It WILL NOT effect the scopes, which is what you want (so you can see the actual data levels on the scopes). It also won't be in the rendered output. Setting the LUT as the "Video Monitor Lookup Table" (while removing it from all other drop-down menus), will result in it being applied to both the grading window AND the scopes. Setting it as the "3D Output Lookup Table" (and removing from all other drop-downs) will cause the LUT to be applied to BOTH the grading window and scopes, as well as any render you might do.